
The Larapinta Trail is one of the best multi-day hikes in Australia. The long distance trail in the Northern Territory was my very first independent overnight hike, and what a trail to decide to tackle as my first overnighter! The 230km trek is a challenging adventure that takes you over almost every ridgeline in the West MacDonnell Ranges of Central Australia. It was certainly an incredible experience and one that I still consider to be amongst the very best that I’ve had in my 30 years on this planet.
While the trail requires a bit of planning and preparation, it’s gaining more and more traction as one of the most popular hikes in the country. If you’re a keen walker, then the Larapinta Trail will surely be somewhere at the top of your hiking bucket list. This guide aims to provide all the information that you’ll need to plan the trail as an independent hiker.
You can also read more about my personal experience on the trail in my day by day track notes.
Disclaimer: This post contains affiliate links which means I get a commission if you buy a product through my link at no extra cost to you. By doing so, I can keep this blog going and continue to create helpful guides for you. Read more: Privacy Policy
Quick Facts About the Larapinta Trail
- Distance: 230km
- Time to complete: 12-16 days on average
- Sections: 12
- Direction: Traditionally west, from Alice Springs to Mt Sonder, but can be done in either direction
- Walking options: Independent end to end, multi-day sections, commercial tours, guided treks and day hikes
- Campgrounds: Official trailhead campgrounds and wild camping options
- Fees: $25 per night walking fee or maximum $125 for 5+ nights plus camping fees of $10 per night
- Respect: The trail is on the traditional land of the Arrernte people of Tjoritja/West MacDonnell Ranges.
Sections of the Larapinta Trail
There are 12 sections of the Larapinta Trail of varying length and difficulty.
Section 1: Telegraph Station to Simpsons Gap
- Distance: 24km
- Time: 7-8 hours
- Difficulty: Moderate
- Camping: Wallaby Gap and Simpsons Gap
- Highlights: Views from Euro Ridge back towards Alice Springs and a chance to explore the semi-permanent waterhole at Simpsons Gap.
Section 2: Simpsons Gap to Jay Creek
- Distance: 25km
- Time: 8-9 hours
- Difficulty: Moderate
- Camping: Mulga Camp and Jay Creek
- Highlights: One of the least scenic sections, but Arenge Bluff and Spring Gap are nice spots.
Section 3: Jay Creek to Standley Chasm
- Distance: 13.6km
- Time: 5 hours
- Difficulty: Hard
- Camping: Millers Flat and Standley Chasm
- Highlights: Beautiful views for much of the trail, with an alternative high route option offering even better vistas. The chance to walk down into Standley Chasm from the Chewings Range.
Note: Camping at Standley Chasm is $18.50, including entrance into the chasm. This is privately run by the local Traditional Owners and includes access to showers, toilets, and laundry.

Section 4: Standley Chasm to Section 4/5 Junction
- Distance: 18km
- Time: 8 hours
- Difficulty: Hard
- Camping: Brinkley Bluff and Section 4/5 junction
- Highlights: The challenging but breathtaking view atop Brinkley Bluff, which is a popular wild camping spot.
Section 5: Section 4/5 Junction to Hugh Gorge
- Distance: 15km
- Time: 8 hours
- Difficulty: Hard
- Camping: Fringe Lily Creek and Hugh Gorge
- Highlights: One of the most scenic and challenging sections with a climb through Spencer Gorge and walk down Razorback Ridge, before incredible views through Hugh Gorge.
Section 6: Hugh Gorge to Ellery Creek
- Distance: 29km
- Time: 10 hours
- Difficulty: Moderate
- Camping: Ghost Gum Flat, Rocky Gully, Ellery Creek North and Ellery Creek South
- Highlights: A nice walk through open plains of Alice Valley towards the popular swimming hole at Ellery Creek.
Read more: Hiking the Larapinta Trail End to End Solo Part 1

Section 7: Ellery Creek to Serpentine Gorge
- Distance: 12.8km
- Time: 5 hours
- Difficulty: Moderate
- Camping: Serpentine Gorge
- Highlights: An undulating trail across the northern side of the Heavitree Range to the semi-permeant water hole at Serpentine Gorge.
Section 8: Serpentine Gorge to Serpentine Chalet Dam
- Distance: 13.5km
- Time: 5 hours
- Difficulty: Moderate-Hard
- Camping: Counts Point and Serpentine Chalet Dam
- Highlights: The incredible views at Counts Point Lookout make the climb worthwhile, with a steep descent to the valley again and onto Serpentine Chalet Dam.
Section 9: Serpentine Chalet Dam to Ormiston Gorge
- Distance: 28.6km
- Time: 10 hours
- Difficulty: Moderate-Hard
- Camping: Waterfall Gorge, Mt Giles Lookout and Ormiston Gorge
- Highlights: Walking through the sacred Inarlanga Pass, with spectacular views to enjoy at Mt Giles Lookout and finishing down at Ormiston Gorge.
Note: This is the longest section without access to water on the Larapinta Trail. You must carry enough with you for the entire section. Camping at Ormiston Gorge costs $10, which includes access to showers, toilets and BBQs.

Section 10: Ormiston Gorge to Finke River
- Distance: 9km
- Time: 4 hours
- Difficulty: Moderate
- Camping: Finke River
- Highlights: A nice view from Hilltop Lookout with Mt Sonder looming closer, plus a nice sandy campsite near Finke River.
Section 11: Finke River to Redbank Gorge
- Distance: 25.8km
- Time: 9-10 hours
- Difficulty: Moderate-Hard
- Camping: Glen Helen Gorge, Hilltop Lookout, Rocky Bar Gap and Redbank Gorge
- Highlights: Spectacular views after a long climb up to Hilltop Lookout and gradual descent to Rocky Bar Gap and Redbank Gorge with views of Sonder.
Note: There is an optional detour on this section to Glen Helen Gorge from Finke River. At the gorge, you can find a private lodge with camping, rooms, a restaurant, bar and hot showers. Some hikers add a night in here to get a beer!
Section 12: Redbank Gorge to Mount Sonder
- Distance: 15.8km
- Time: 6 hours
- Difficulty: Moderate-Hard
- Camping: Redbank Gorge
- Highlights: The stunning finish of the Larapinta Trail at the summit of Mt Sonder, the fourth highest mountain in the Northern Territory. Many hikers make it a sunrise hike to be at the summit as the sky and landscape light up with the incredible colours from the sun.
Read more: Hiking the Larapinta Trail End to End Solo Part 2

Why Hike the Larapinta Trail?
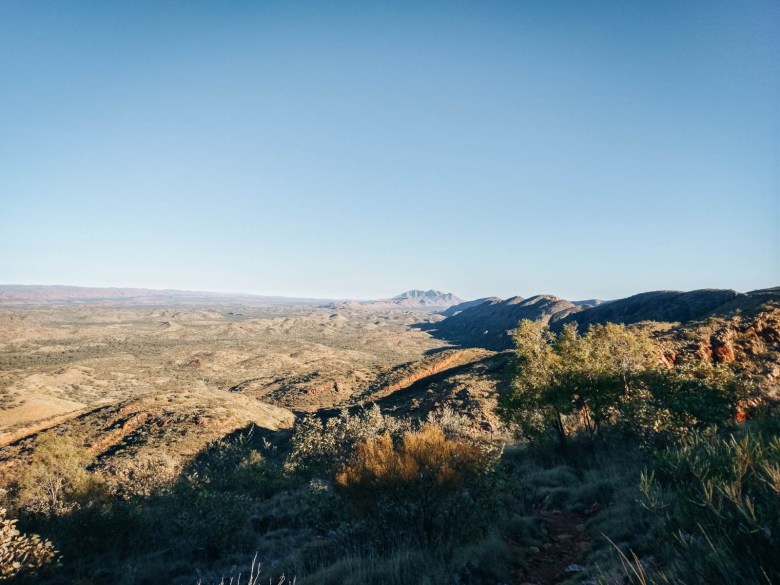
Why the hell not? This trail is up there as one of the most spectacular in Australia. It’s often even considered as one of the best in the world! It takes you to some of the most popular spots in the West MacDonnell National Park, including Simpsons Gap, Standley Chasm, Ellery Creek, Ormiston Gorge and Redbank Gorge. But you also get to see some of the remote and yet equally spectacular places that only hikers can possibly reach, including Brinkley Bluff, Hugh Gorge, Counts Point Lookout and Inarlanga Pass.
The rugged and rocky landscape is extremely challenging but also makes it one of the most unique hiking trails in the country. The landscape is relentless, with steep ascents and descents and very few “easy” sections. But the views make up for your hard work, with some of the best sunrises and sunsets you’ll ever see.
The good facilities make the hike comfortable enough, but it still requires some planning and experience. It’s the ultimate challenge in the Northern Territory, along with the Jatbula Trail in the Top End, and is a must for anyone who enjoys hiking.

When to Hike the Larapinta Trail
It’s recommended to hike the trail between the dry and cooler winter months from May until September. This provides the most ideal temperatures and conditions to walk and camp in Central Australia. There can still be a dramatic difference in temperature at this time though, with lows of -5 degrees overnight and highs of 24 degrees during the day when I did it in July.
Outside of these months, you can expect heavy rain in spring/wet season and scorching temperatures in summer. It’s recommended to only undertake the Larapinta outside of the main hiking season if you’re extremely experienced and prepared.

Cost of the Larapinta Trail and Booking System
Up until 2022, the trail was free. The only cost to hiking the trail was a couple of the campgrounds which had fees and any food drops or trail transfers you arranged with a private company. However, as of 2022, there were walking and camping fees introduced by NT Parks.
The walking fees are $25 per night up to a maximum of $125. So, for any planned itinerary longer than five nights, you will pay $125.
There are also camping fees as well. Most of the camps on the Larapinta Trail come under category B, which means $10 per adult per night. This includes wild camping sites like Brinkley Bluff or Counts Point and similar places.
The only exception for this is for the two private campgrounds at Standley Chasm (privately owned) and Ormiston Gorge (public drive-in campground), which have their own payment system on arrival.
You must book your hike in advance and pay the fees outlined here. You can do that on the NT Parks online booking system here.
Camping on the Larapinta Trail
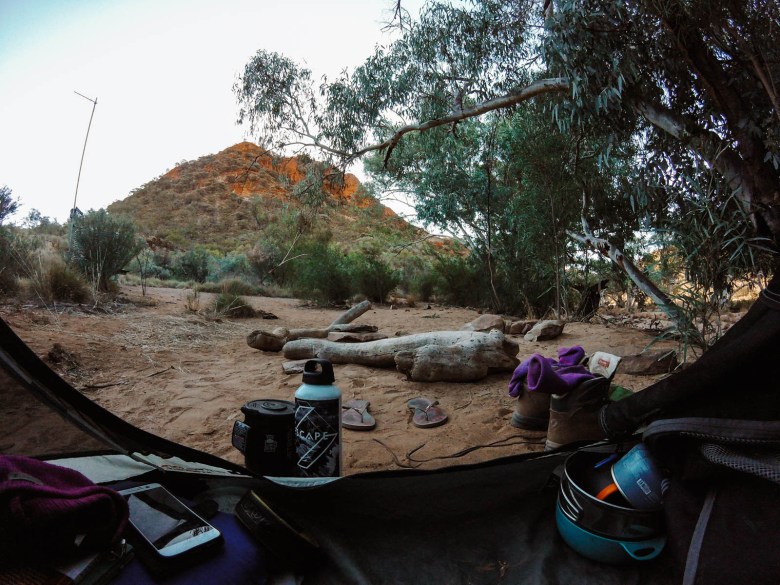
The Larapinta has a variety of camping options, from the official trailhead campgrounds and wild camping throughout the trek. With recent upgrades, you can expect basic but good facilities at the main campgrounds.
The section trailhead campgrounds include a shelter, with most now including USB charging outlets and platforms. You’ll also find a drop toilet and water tank. Some campgrounds have designated camping spots, with sandy tent pads, but otherwise you can pitch anywhere around the shelter. Trailheads are listed above, under sections of the Larapinta Trail.
There are also some campgrounds in between trailheads which have upgraded facilities including a toilet and water tanks, due to their popularity amongst hikers. These are helpful to break up longer sections.
Some of these popular campgrounds include:
- Wallaby Gap (section 1)
- Mulga Camp (section 2)
- Rocky Gully (section 6)
- Rocky Bar Gap (section 11)
Wild camping is allowed in some designated sites on the Larapinta Trail. If you get your hands on a Larapinta Trail map, you will see places marked as camping with no facilities. These are dry campgrounds, with no toilets or water tanks, requiring you to carry additional water if you’re planning on staying the night.
Popular dry camp spots include:
- Brinkley Bluff (section 4)
- Fringe Lily Creek (section 5)
- Counts Point (section 8)
- Mt Giles Lookout (section 9)
- Hilltop Lookout (section 11)
IMPORTANT: You are only allowed to camp in designated camping areas on the Larapinta Trail, which includes a combination of “wild camping” spots and trailhead camps explained above. There are 26 designated camping areas in total. You can find the complete list here.

Larapinta Trail Itineraries: How Long Does it Take to Complete
The entire trail is around 230km long. The terrain is tough and even though the sections are broken down into 12, planning your itinerary requires some extensive consideration.
The most popular itinerary is 14-15 days. However, some people do it in 12 or take as long as 18 with a couple of rest days. This comes down to your own experience, fitness level and availability of time. I personally think 14-15 days is a good itinerary to give you some decent rest in the afternoons. However, if you’re a fast walker and limited on time, 12 days can be a good option.
There are a lot of different itinerary options that you can put together yourself, with endless variations. The ideal way to tackle it is by working out which campsites you definitely want to stay at, especially those in between trailheads.
For example, most independent hikers want to camp at Brinkley Bluff and Mt Giles Lookout (for the unforgettable views), as well as, Ormiston Gorge and Standley Chasm (for those hot showers and kiosks!). This will then help you work out an itinerary around those places.
Don’t forget to look at distances and difficulties between trailheads though, as this will also help you work out your estimated walking time between camps and water tanks.

Transport and Logistics
The Larapinta Trail starts at Telegraph Station just outside of Alice Springs and ends at Mt Sonder, with the nearest vehicle car park at Redbank Gorge.
This is where I get to talk about one of my favourite hiking services going around. Larapinta Trail Trek Support (LTTS) is the main trail support service in Central Australia, offering independent hikers basically everything that you’ll need to tackle this trail safely and comfortably.
They offer a range of services, including gear hire, trek supplies, food drops and trail transfers. I can say that the majority of self-guided, independent and solo hikers use Zak and his team at LTTS in some way for their Larapinta Trail adventure.
They have support packages for end to end hikes and multi-day sections, with dedicated packages for solo hikers up to larger groups. They offer basic support, with added extras available to purchase on top of any package.
I opted for the End to End Solo Essentials Trek Package. This includes trail transfer, x3 food drops with 50L plastic containers provided, PLB hire and stove fuel, which costs about $570 all up. But you can find an option to suit your hike and budget.

On a Budget? How to Organise Your Own Food Drops and Transport
You can arrange food drops yourself. Standley Chasm, Ellery Creek South, Serpentine Gorge and Ormiston Gorge are the designated places for food drops. You can drive them out there yourself, but you must arrange access prior.
The key for Ellery Creek, Serpentine Gorge and Ormiston Gorge food drop rooms can be obtained from the Visitor Centre in Todd Mall, Alice Springs. There is a $50 deposit, plus $10 fee for the service. Standley Chasm is privately run, and you simply need to ask to leave a box there behind the counter. Find more information about food drops here.
You can then arrange just a trail transfer at the end of your hike with LTTS (around $330), or you can even try to hitch a ride to/from Redbank Gorge.
I would highly recommend still carrying a PLB with you for your own safety. If you already have your own then that’s great, but they can be pricey units. You can hire them through LTTS if you need.
At the end of the day, the packages that LTTS offer actually work out pretty reasonable and gives you peace of mind that the logistics for food drops and pick ups are managed for you.
Always carry a Personal Location Beacon (PLB) in case of emergency, like this Ocean Signal PLB which is small and lightweight.

Safety on the Larapinta Trail
Being such a challenging and remote trail in the Red Centre, there’s a few safety issues to consider when planning your trek.
Remoteness and Trail Access
The trail is quite remote as it crosses inaccessible parts of the West MacDonnell National Park, including the Chewings Range, West MacDonnell Range and Heavitree Range. While you feel a world away from any civilisation, most of the trailheads are still vehicle accessible.
However, a lot of the trail access is on a rough 4WD track and many of the trailheads are not regularly visited by anyone other than hikers. For this reason, you should carry a Personal Location Beacon (PLB) with you in case of an emergency. There are also log books at each trailhead which provides Rangers with knowledge about hiker movements.

Phone Signal and Reception
There is very limited phone reception anywhere on the Larapinta Trail. You should not rely on being able to contact people at any stage. Again, carry a PLB people!
But if you want to do a quick Instagram update and send a message to your mum, then here are some of the spots you can find phone signal:
- Simpsons Gap (Telstra only)
- Standley Chasm (Telstra only)
- Brinkley Bluff (limited Telstra and Optus)
- Ormiston Gorge (Optus only)
Snakes and Other Animals
While snakes can be found in the area, they’re very rare during the cooler months. You should remain vigilant but I never saw any and I haven’t met anyone who has.
Serious dangers mainly come in the form of injury or snakes. Make sure that you carry a first aid kit, including a snake bite bandage, in case of emergency.
Dingoes are prevalent in the area, especially from Simpsons Gap through to Ellery Creek, but also beyond. While they’re not usually aggressive, I’ve heard stories of them approaching tents looking for food. Make sure that you keep your food safely away from animals, either hanging from a tree in a dry bag, in the supplied cupboards at the shelters, or in your pack inside your tent.
Mice can also be a common problem during the popular weeks in the middle of winter, when there’s a lot of hikers out and about. If you’re camping near the shelters, use the cupboards to store your food bag or hang it from a tree using fishing line or similar.

Heat and Weather Conditions
While in the winter months the heat is usually very manageable, you should make sure that you stay hydrated. The temperatures can still be in the mid-20s during the day. The dramatic changes can be tough for some people, especially as overnight it can drop below zero. It’s important to pack layers so that you can prepare for the range of temperatures of the desert.
In spring, heavy rainfall and flooding is common, with some of the trail becoming impassable. In summer, scorching temperatures make it almost unbearable to walk, plus bushfires have happened in recent years. Let’s just stick to winter! (Or read my post on hiking in extreme heat.)
Read more: How to Survive Hiking in Extreme Heat
Should you Hike the Larapinta Trail Solo?
Of course, you should! In all seriousness, it’s quite common to hike the Larapinta Trail as a solo hiker. I was quite surprised to be far from the only one out there when I did it. It’s a very social trail and I met some incredible people who made the experience even better. If you’re a little anxious, it’s ideal to do the trail in June or July, the two busiest months when you’ll definitely see plenty of others out there.
However, it’s important to be prepared for some tough sections and know that you’re completely in your own hands when it comes to safety. While it’s certainly challenging, it’s an incredible trail to enjoy as a solo hiker and definitely a popular choice.
Read next: A Complete Guide for Solo Hiking

Navigation
The Larapinta Trail is relatively well marked with large blue arrows on white squares. They’re placed at nice intervals, but you can’t always see the next arrow from where you’re standing like on the Jatbula for example.
Still, the trail is relatively well worn and easy to follow. However, on dry creek bed crossings and through some gorges it can be difficult to see where the trail is. It’s ideal to have a GPS app on your phone, such as Maps.Me or Far Out app.
Carrying a paper map is also a good idea, if you know how to read it properly. NT Parks sell an information pack with Larapinta Trail maps for each section, which can be useful for planning as well.
Navigation for long distance trails: I recommend the FarOut App for any long distance hiking trail, including the Heysen Trail, Bibbulmun Track, Australians Alps Walking Track and more!

Food and Water
As mentioned above, you can have three food drops on the trail. These are spaced nicely so that you only need to carry around four days worth of food at a time.
Another nice addition to the trail are the cafes at Standley Chasm and Ormiston Gorge. Most hikers have a feed at both spots, to have a break from dehydrated food. They’re both usually open from 10am to 4pm.
Water is provided in water tanks along the trail. They are checked and maintained by Parks Rangers, so it’s nice not having to worry too much about access to water. They’re available at every trailhead and a couple of other campgrounds between sections.
In the winter months, it’s difficult to find many other water sources, so it’s ideal to fill up every time you come across a tank. The longest section without a water tank is section nine, Serpentine Chalet Dam to Ormiston Gorge, which is around 29km.
While Parks recommend treating the water, it’s usually trucked in from Alice Springs. I had no problem drinking the water, but it’s always a good idea to bring along a LifeStraw bottle or something similar just in case.
Read next: How to Plan Your Food for Hiking

Preparation and Training for the Larapinta Trail
The Larapinta is definitely quite challenging even for fit hikers. You’ll want to make sure that you have a decent level of fitness before heading off. While everyone is different, it’s advised to do some training hikes with steep hill climbs to get yourself used to those long ascents.
While I didn’t do a lot of training, I did do the same 12km hike twice a week, which had a long 6km ascent and then 6km descent. This was on top of running a couple of times a week as well.
Here are some of my top tips for training for the Larapinta Trail:
- Train for long ascents and descents: Find a decent hill climb near where you live and try to do it at least once a week in the lead up to your trek.
- Train for rough, rocky terrain: Try to train as much as possible on dirt, uneven tracks. It’s difficult to find somewhere that replicates the Larapinta, but anywhere that requires you to keep your eyes on the ground and watch your footing should be enough.
- Train for time on your feet: Depending on how much ground you plan on covering each day, you can walk anywhere from 3-8 hours per day on the Larapinta. This means that your feet and legs need to get used to walking continuously for hours. Although your body will naturally adapt on the trail, it’s a good idea to do some long walks around the 20km mark in your training to get the time and distance into your legs.
- Work on balance, strength and agility: The Larapinta is as much about strength and agility than fitness sometimes. The rough, rocky terrain is a constant challenge and often forces you to slow down. If you’re interested in adding in strength training or yoga, it would be beneficial.
- Break in your shoes well: This should be a no-brainer but you should break your shoes in and know that they are comfortable for hours on end. Choose shoes or boots that you know work well for your feet and that you have tried and tested before. Problems with shoes are the number one reason people don’t finish the Larapinta!
- Give yourself time: Unless you’re already fit and have plenty of long-distance walks under your belt, I recommend giving yourself at least 3 months to train and prepare.

What to Pack for the Larapinta Trail
A Larapinta Trail packing list is an essential piece of information to end this ultimate guide to the trail. Here’s everything that you’ll need to get you through this spectacular hike.
Gear and equipment
- Lightweight tent
- Sleeping bag
- Insulated sleeping mat
- Inflatable pillow (luxury item? maybe!)
- Head torch
- Trowel
- Water bladder 3L
- Sawyer Squeeze Filter
- Backpack (I used 65L)
- Power bank
- Hiking poles (optional)
Clothing
- Beanie
- Cap or hat
- UV resistant long sleeve shirt
- Merino wool hiking t-shirt
- Hiking pants or tights
- Thermals
- Fleece jacket
- Merino hiking socks
- Rain jacket outer shell
- Hiking boots
Toiletries and medical
- Microfibre towel
- Lip balm SPF
- Sunscreen
- Toilet paper (although most of the toilets had paper!)
- First aid kit
- Snake bandage
- Emergency blanket
- Electrolytes
Cooking
- Utensils
- Matches
- JetBoil fuel
- JetBoil stove
Read more: Overnight Hiking Packing List

Where to Stay in Alice Springs
If you’re wondering where to stay before and after your hike, Alice Springs has a range of accommodation options. Here are my top choices.
Alice Lodge Backpackers || If you’re looking for budget accommodation, I stayed at the Alice Lodge Backpackers before and after I did the trail. It’s a really friendly place to meet other travellers and it’s walking distance from town. Check prices here.
Elkira Court Motel || A nice place close to the centre of town, this motel has double rooms starting from $120 per night. They also have an outdoor pool and bar for relaxing after your hike. Check availability here.
Desert Palms Alice Springs || For a bit more luxury, Desert Palms is one of the nicest places to stay in Alice Springs. They offer individual studio villas on a beautiful property with a large outdoor pool. Prices start from around $150 per night. Check availability here.
Looking for More Multi-day Hikes in Australia?
Jatbula Trail: A Complete Guide to Hiking the Jatbula Trail
Great Ocean Walk: A Complete Guide to the Great Ocean Walk
Heysen Trail: A Guide to Thru Hiking the Heysen Trail in South Australia
Bibbulmun Track: A Guide to Thru Hiking the Bibbulmun Track in WA
Cape to Cape: A Guide to the Cape to Cape Track in WA
Falls to Hotham: A Guide to the Falls to Hotham Alpine Crossing in Vic Alps
Pin this post


[…] Trail solo, both the highs and the lows. If you prefer to learn more about the trail, read my guide to the Larapinta Trail […]
[…] hadn’t carried a full pack since doing the Larapinta Trail, and so it was a little bit of a shock to the body. However, just like the Larapinta, it was an […]
[…] first overnight hike was a huge undertaking. I decided to do the multiday Larapinta Trail in Australia, which is really not your ideal first backpacking adventure. But I survived and […]
[…] and not as agile. I made this mistake with not training enough with a heavy pack for the Larapinta Trail. On the first day, I tripped and fell simply due to struggling with my balance because I wasn’t […]
[…] Trail for some time, having completed the Northern Territory’s other well-known trek, the Larapinta Trail, back in 2018. However, due to the restricted permit system and the short hiking season in the Top […]
Great summary – many thanks. I am in the research phase for this walk – Winter 2023. Apparently the booking system crashed because of the demand last week! Mel
I can imagine! Hopefully the booking system still allows the Larapinta to be accessible to all, it’s such an incredible walk. Good luck with your planning!
[…] rock art. The one-way trek is the most popular multi-day hike in the Top End, and along with the Larapinta Trail, makes up the two most outstanding hiking experiences in the Northern […]
[…] Telegraph Station also marks the beginning or end of the Larapinta Trail. This 223km long trail traverses across the West MacDonnell Ranges to Mt Sonder and is considered […]
[…] Larapinta Trail in Australia […]
[…] first introduced to this spectacular landscape when I set off on a solo end to end journey on the Larapinta Trail in 2018. This time around, I was stoked to be back in the national park as a tourist rather than a […]
This is an awesome post, thanks for putting this together. Your hard work is much appreciated! 🙂
[…] I’ve had for years. I borrowed this Sea to Summit sleeping mat off my dad in 2018 for the Larapinta Trail and have never managed to give it back… sorry dad. But this is a very popular inflatable […]