
The Falls to Hotham Alpine Crossing is one of the most popular multi-day hikes in Australia. The 39km, 3-day, one-way trek is definitely one for your hiking bucket list. Following the Australian Alps Walking Track as it connects two of Victoria’s biggest ski resorts, the hike is an incredible introduction to the High Country.
As it’s one of the best multi-day hikes in Victoria, I thought I’d put together a complete guide to the Falls to Hotham Alpine Crossing to help you complete this incredible trek in the Alpine National Park. I’ve spent many summers hiking around the area, and I know these trails well. If you’re looking for a beginners hike in the alpine region, this is for you.
Disclaimer: This post contains affiliate links which means I get a commission if you buy a product through my link at no extra cost to you. By doing so, I can keep this blog going and continue to create helpful guides for you. Read more: Privacy Policy
Quick Facts About the Falls to Hotham Alpine Crossing
- Distance: 39km (it’s commonly advertised as being 37km, but the first section is longer than the official distance stated on Parks Victoria)
- Time to complete: 3 days (can be done in 2 if you’re fit)
- Difficulty: Moderate
- Direction: Traditionally from Falls to Hotham, but can be done in either direction
- Campgrounds: Official campsites at Cope Hut and Dibbins Hut or wild camping elsewhere
- Fees: There are camping fees at Cope Hut and Dibbons Hut if you wish to use the platforms, otherwise, wild camping is free in the national park
- Respect: This part of the Alpine region is the traditional home of the Gunaikurnai, Taungurung, Dhudhuroa and Jaithmathang people
- More hikes: 17 Best Multi-Day Hikes in Victoria

When to Hike the Falls to Hotham Alpine Crossing
The best time to hike in the Alpine region is from November until April. This is the summer season or green season in the High Country, meaning days are generally warm, with cool nights and less chance of rainfall or snow.
Between May and October, snowfall is common in the area, and the weather can be even more unpredictable than normal.
No matter what time of year you decide to hike this trail, just remember that the alpine is very unpredictable and harsh. You may experience freezing temperatures, storms and snow at any time, so pack accordingly and be prepared to change your plans if the weather changes.

Getting to Falls Creek
From Melbourne: The Falls Creek Alpine Resort is 380km or a 5-hour drive away from the CBD via Seymour, Benalla, Myrtleford and Mount Beauty.
From Mount Beauty: As the nearest main town to Falls Creek, it’s just 30km or a 45 minute drive on a windy sealed road from Mount Beauty to Falls Creek.
Where to Stay Nearby
If you’re interested in staying in Mount Beauty before you start your hike, check out these places:
Kiewa Country Cottages | Just outside of town, this popular property is perfect for a mountain escape. They offer a couple of two bedroom cottages set amongst some trees and a pretty garden on the property. Each cottage is fully self contained and you can enjoy the outdoor pool and fireplace before your long hike. Check availability here.
No. 43 Loft | Located on the main highway before you come into Mount Beauty, this loft accommodation is a cosy spot for a couple or solo traveller to stay. The beautifully modern loft has a kitchenette, private bathroom and balcony with mountain views. Check availability here.
Prefer camping? You can camp at Pretty Valley up at Falls Creek which is a great place with beautiful surroundings and a basic long drop toilet. It’s only 7km up a dirt road from the Heathy Spur Trailhead at Falls Creek, so it’s nice and close. It’s free to camp there.

Parking and Logistics
Whether you start in Falls Creek or decide to go against the tide and start in Hotham, there’s parking and transfer options for each direction.
The main trailhead in Falls Creek is Heathy Spur Trailhead right on the edge of Rocky Valley Dam. There is a small car park off the main road with room for around 8 cars.
At the other end at Hotham, there is a car park at Mount Loch Car Park, which is where you’ll finish (or start). There is a recently completed large carpark here for hikers. The other option is to park at Corral Carpark, which is at the Hotham Resort Management Office down the road from Mt Loch Carpark in the village area. This will add around 1km onto your hike.
Trail Transfers
If you don’t want to car shuffle between both ski resorts as this obviously adds a bit of time and effort, there are a few Falls to Hotham Alpine Crossing shuttle options available. These are privately run.
I recommend Snow Dog Transport. Hamish is a great all round guy who offers a range of transport and logistical help in the Alpine region. One of his many services is a Falls to Hotham shuttle and vice versa for all hikers for $85 per person ($340 shared minimum cost). You can find his website here with contact info. Bookings are essential.

Falls to Hotham Crossing Itinerary
Most people plan for a three day hike, but it can be done in two days if you’re fit and experienced. I’m going to detail the standard three day hike itinerary below, which allows you time to really appreciate the beauty of the alpine region.
Day 1: Falls Creek to Cope Hut
- Trailhead: Heathy Spur Trailhead
- Distance: 16km
- Time: 4-6 hours
The Falls to Hotham Crossing begins with a bit of a steady climb. Follow Heathy Spur Track as it winds away from Falls Creek with great views back to the dam. It’s a steady but not too challenging ascent for 4km until you start to drop down towards the intersection with Big River Firetrail which leads up to Mount Nelse.
You need to turn right onto Big River Firetrail and head down away from Mount Nelse. After just under a kilometre on the firetrail, you should then take the walking track that will be on your right. This can be a little confusing at first because it’s a major junction of wide firetrails but you’ll see the skinny walking track heading down.
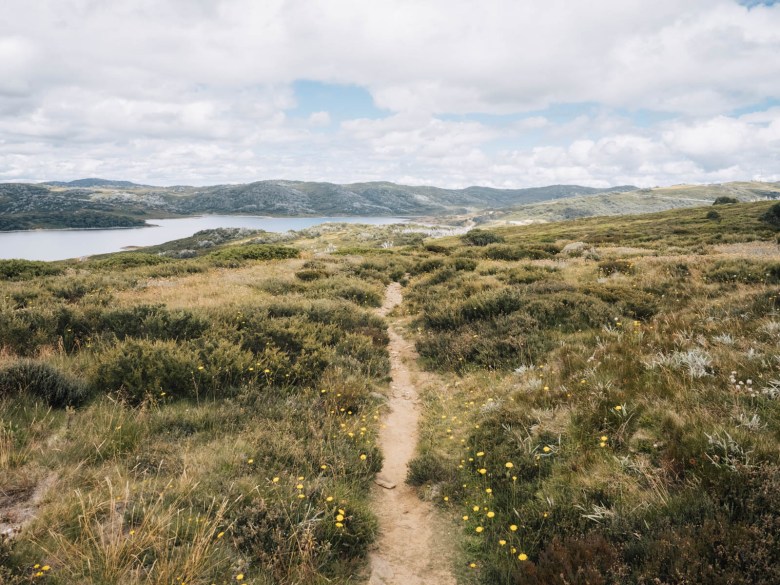
This trail descends for 2km to the Langford East Aqueduct Road. It can be a little rough with mud and overgrown branches, but it’s easy to follow until you cross the aqueduct on a wooden bridge and hit the flat section.
Turn right and follow the aqueduct for an easy 7km of flat walking on a wide track. You’ll pass Langford Gap West, the old Bogong Rover Chalet and Wallaces Hut on the way. After the 7km on the management track, you’ll see a skinny walking trail making a shortcut up towards Cope Hut which is part of the Wallaces Heritage Trail.
As you approach Cope Hut, the camping area can be accessed via the first trail on your left before the hut itself. The drop toilet and water tank are right there on the main track, and then you’ll walk up to find the platforms, picnic table and other camping areas.

Day 2: Cope Hut to Dibbins Hut
- Distance: 14km
- Time: 4-6 hours
Continuing on towards Hotham, you need to pass the toilet and join back up with the management track again. Head to your left towards the Bogong High Plains Road and crossover to the other side.
The High Plains will be stretched out in front of you as you attempt to walk right across them following snow poles for most of the way. Just 1.5km from the road, you’ll cross a freshwater stream. This is a good spot to pick up water if you didn’t get any at Cope Hut.
From there, it’s a pretty easy 1.8km to Cope Saddle Hut, which is a nice spot to have a break. Then, cross over the Pretty Valley Track road and continue on the Australian Alps Walking Track (AAWT) for the next 4.5km to Pole 333. You’ll cross the beautiful plains along this section, with the trail being relatively flat with just a slight incline.

Take a second at the famous Pole 333 to snap a photo. This snow pole is a significant cross roads for four major trails in the area. From there, you can pick your adventure, with one trail heading to Tawonga Huts and the Fainters, one to Mount Hotham via Dibbins Hut, another towards Mount Feathertop via Westons Spur Track and the one you’ve come on from Falls Creek.
For the sake of the Falls to Hotham Alpine Crossing, you want to turn left on the Australian Alps Walking Track to Dibbins Hut. The next 5.5km continue across the plains with Feathertop rising to your right and Mount Loch and Hotham directly in front. For the last 3km of this section, you’ll start to drop down to Cobrunga Gap and your final destination for the day at Dibbins Hut Camping Area.
You’ll see the camping platforms first on your left and if you keep walking you’ll see some beautiful flat camping spots near the river. There’s a long drop toilet there and if you continue walking for 200m more you can explore Dibbins Hut itself.

Day 3: Dibbins Hut to Hotham
- Distance: 9km
- Time: 3-4 hours
- Finish point: Mt Loch Carpark
The last day may be the shortest but it comes with the most strenuous hill of the three days. First up in the morning, you’ll pass Dibbins Hut and then hit the incline for a steep 1.5km up Swindlers Spur Track. This will get you sweating early in the morning!
But from the top of the spur, the next 2.5km are easier until you get to Derrick Hut. This is a nice spot for a morning break and to rest your legs for a bit.
The last 4km to Mt Loch Carpark is a bit of a rollercoaster. First, the trail climbs to the top of the ridge over Derrick Hut from where you can finally see the Hotham Alpine Resort. Then it follows the ridge around to the right until it meets up with Machinery Spur Track. The last couple of kilometres along this rocky, wide management road might seem a little endless.
It winds it’s way up and down until finally coming into the carpark on the side of the Great Alpine Road at Hotham. However, the views across to Mt Feathertop and even Mount Buffalo way in the distance are incredible on a clear day.
Mount Loch Carpark marks the end of your Falls to Hotham Alpine Crossing. You can either turn left to head into Hotham Village or if you’re lucky, your car will be there in the car park waiting for you.

Camping on the Falls to Hotham Alpine Crossing
The Falls to Hotham Alpine Crossing has two designated camping areas for hikers. Cope Hut and Dibbins Hut offer different but equally beautiful camping locations, showing you the best of High Country camping.
Officially, you need to book both campsites if you’re doing the crossing. It costs $19.10 per night for a platform which fits a standard 2-3 person tent. Both Cope Hut and Dibbins Hut have five platforms each, which you can book through Parks Victoria here.
But you don’t actually need to pay and book to camp at either spot. Technically the payment and booking system covers the platforms, but you can camp anywhere around the hut areas for free. Although they do ask that you don’t camp right next to the platforms to allow those that did pay for them to enjoy it.
I actually personally prefer not to camp on the platforms anyway. At both Cope Hut and Dibbins Hut, there’s plenty of room to pitch your tent on the ground. However, you should be aware that on weekends, and especially long weekends, both areas can be very busy, so respect people’s space and the natural environment that you’re in.

Cope Hut
This is a very beautiful campsite. Nestled amongst snow gums on the Bogong High Plains, the view over the valley from the camping area is incredible and the perfect place to spend the night. There’s a long drop toilet and a water tank, although don’t rely on any water as it’s often dry in summer.
Dibbins Hut
In a very different setting, the Dibbins Hut camping area is in a gully on a snow plains near the Cobungra River. It too is a beautiful spot to camp the night underneath snow gums. There’s a long drop toilet there, and water is easily collected from the river (reliable all year round).
Alternative Camping Options
There are a few alternative places to camp on the way if you wish. Although I would say, none are as nice or convenient as Cope Hut and Dibbins Hut.
Closer to Falls Creek, it’s possible to camp near Wilkinson Lodge ruins which is near Wallaces Hut. It’s not permitted to camp close to Wallaces Hut as it’s a historical landmark, but I was told if you needed you could camp near the lodge ruins.
Another option is to camp at Cope Saddle Hut. Situated right on the edge of Pretty Valley Track and in between Cope Hut and Pole 333, it’s not a bad spot if you needed to break up the section or are trying to do the whole crossing in two days. There’s a steady stream there for water.
Finally, Derrick Hut is a nice place to camp closer to Hotham. While it’s only around 4km from Hotham, it’s a good alternative to Dibbins Hut if it’s too crowded or if you want a quick finish the last day. There’s a long drop toilet there and a stream not too far away if needed.

Essential Information for the Falls to Hotham Alpine Crossing
Here’s some further information if you’re planning on doing this hike, including safety and gear essentials.
Safety Tips
Hiking from Falls Creek to Hotham is a relatively safe option in the alpine region. The trail is quite popular and well worn, with good phone reception across much of the way. I had good Optus coverage at Falls Creek, right across the Bogong High Plains, at Cope Hut and as I got closer to Hotham. The only spot I didn’t really have any was around Dibbins Hut. I suspect Telstra would be very similar, if not better.
The only real danger you’ll face is the weather and snakes. The weather in the alpine is unpredictable and you should pack for all conditions. Snow and storms can happen at any time, so it’s best to at least be prepared for cold conditions even in summer.
Serious dangers mainly come in the form of injury or snakes. Make sure that you carry a first aid kit, including a snake bite bandage, in case of emergency.
Snakes are common on the High Plains, especially if the sun is shining you may see a couple out and about. Generally, they will be Highland Copperheads up above the snowline, which are poisonous but docile. Just give the snake room to move itself off the trail and you won’t have any problems.
Always carry a Personal Location Beacon (PLB) in case of emergency, like this Ocean Signal PLB which is small and lightweight.
Read next: How to Leave no Trace and be Respectful in the Outdoors

What to Pack and Essential Gear
I’m not going to list everything that you need here, but I will list some of the essential gear you should have for the High Country.
Sleeping bag | You’ll want a good sleeping bag for the High Country, one that will keep you warm no matter the temperature and be lightweight enough to pack easily in your backpack. Sea to Summit is one of the best brands on the market and you can’t go wrong with their Spark -9 degree bag.
Backpack | A 65L pack is usually a good option for multi-day hikes, especially in the Alpine region when you’re going to be carrying warm gear.
Hiking boots | I’m a bit old fashioned when it comes to my footwear and I can’t hike without my hi-cut boots. I’ve been wearing Keen Targhee boots for a couple of years and I’m super happy with them on all adventures.
PLB | Any hiker, especially a solo hiker, should carry a Personal Location Beacon. For the cost, these small devices can save your life anywhere, anytime. If you don’t want to buy one, you can hire one from any Macpac store, find out more here.
Power bank | I rely on my phone (maybe too much) while I’m hiking. From Maps.Me to recording videos to listening to music, I can recommend the BioLite power bank which will easily last days off the grid.
Tent | Try to keep your tent below 2kg as this can quickly become your heaviest piece of gear. I currently have the Big Agnes Copperspur 2-person tent, and it’s been my go-to for all my alpine hiking adventures.
Down jacket | You should be prepared for any weather on alpine adventures, so a down jacket is a must to ensure you keep warm. This Patagonia Nano Down is lightweight, warm and water repellent, so it’s perfect for the High Country.

Food and Water
You’ll need to carry all your food with you for this hike. Being just three days this is easily doable for most people. You can pick up last minute supplies in Mount Beauty which has a Foodworks, otherwise there is also a small Foodworks in Falls Creek and a General Store in Hotham if you need.
Read next: How to Plan Your Food for Hiking
You need to be aware of water supply out on this trail, as you can’t rely on the water tanks being full. There is a water tank at Cope Hut, but it was dry when I was there in February and I wouldn’t rely on it having much water in summer.
There is a small creek running below the Cope Hut camping area, opposite the dirt road if you need. Otherwise, a more reliable water source is the stream that you have to cross on a footbridge just 2km before Cope Hut on the second day as you head across the Bogong High Plains or the stream next to Cope Saddle Hut on the same day. This is a good spot to pick up water for the day.
Otherwise, the Cobrunga River passing along Dibbins Hut runs all year round, with plenty of water.
For filtering water on a multi-day hike, I use a Sawyer Squeeze Filter because it’s small, lightweight and easy to use. For shorter hikes, I also have a Lifestraw filter bottle, which is great for day hikes and everyday travel.

Trail Navigation
While the trail itself is not waymarked with arrows consistently, it’s relatively easy to follow. The Falls to Hotham Alpine Crossing is extremely popular so the track is well worn and you’ll likely pass other people out there. All track junctions and intersections are signposted, so you need to follow signs for the Falls to Hotham Alpine Crossing and the AAWT.
It still helps to have a GPS or map app or some sort of navigation device so you know where you’re heading. This is especially important if visibility changes and you get caught in bad weather. For a relatively moderate hike like this you could rely on an app like Maps.Me or AllTrails, which has these trails marked on it.
🧭 Find the trail on AllTrails here. If you have the Plus or Peak membership, you can download this for offline use.

Nearby Multi-day Hikes at Hotham and Falls Creek
If the Falls to Hotham Alpine Crossing is too popular for you or you want another great multi-day hike around the alpine region, then check out these options:
- Hotham: Three Day Loop Around Hotham via Mt Feathertop and Dibbins Hut
- Falls Creek: Three Day Loop Around Falls Creek via Mount Jaithmathang and Falls Creek
- The Fainters: Hiking to The Fainters from Hotham
- Bogong: Four Day Mount Bogong Circuit Hike
Pin this post


[…] decided to make a three day loop hike at Falls Creek. The much more popular Falls to Hotham Alpine Crossing is a one way trail, which makes it difficult for us solo hikers. So instead, I had a look at a map […]
[…] trek report from the three day overnight hike at Hotham. It’s a great alternative to the popular Falls to Hotham Alpine Crossing, which is a one way hike and not ideal for solo hikers. Plus, you also get to camp near the summit […]
[…] the Fainters from Hotham, making it an extended three day, out and back hike. I used part of the Falls to Hotham Alpine Crossing, before turning off to the historic huts and camping area, from where I took the Fainter Fire Trail […]
[…] this provides prime hiking conditions. While it certainly doesn’t see as many hikers as Mount Hotham and Falls Creek, there’s no shortage of trails to explore from shorter trails to longer overnight […]
[…] Complete Guide to the Falls to Hotham Crossing (VIC) […]