
Lake Tali Karng has a mystical aura about it. The natural alpine lake in the Victorian High Country has captured the attention of many hikers, explorers, and all-round nature nerds for generations. As a sacred place for the Gunaikurnai people, it’s easily one of the most special hiking destinations in the Aussie Alps.
Lying deep in a valley over the Wellington Plains up past Licola, it is the only natural lake located in the Alpine National Park. Accessible only on foot, it makes for a great overnight hike with several routes for reaching the lake for a variety of experience levels.
We decided to head to Lake Tali Karng via the Wellington Plains on an overnight hike in January. A place we’d been dreaming of for a few years, it did not disappoint. In this blog, I’m going to detail all the different routes to reach the lake, including where to camp.
Disclaimer: This post contains affiliate links which means I get a commission if you buy a product through my link at no extra cost to you. By doing so, I can keep this blog going and continue to create helpful guides for you. Read more: Privacy Policy
About Lake Tali Karng
Lake Tali Karng is a hidden alpine lake in the Victorian Alps in north Gippsland. Protected by towering peaks and rocky escarpments, it’s fed by the snowmelt of the Wellington Plains and produces an underground stream, which emerges below in the Wellington River.
The lake is a sacred site for the Gunaikurnai people. In fact, Aboriginal people guided early European explorers to the lake, who wrongly assumed it had never been visited before by humans. The Gunaikurnai people were the first to call this area home for thousands of years.
In keeping with tribal laws and respect for their Elders, Aboriginal people are now forbidden to go to the lake. However, they have approved non-Indigenous people visiting the lake, as long as the area is treated with respect. This means not camping near the lake, and camping at the purpose-built Nyimba Camp instead or further down the Wellington River.
Different Routes to Lake Tali Karng
There are a couple of different routes to reach Lake Tali Karng: via the Wellington Plains from McFarlane Saddle or via the Wellington River from Tamboritha Road. Plus, there’s also a shorter option via Millers Hut.
It makes for one of the best overnight hikes in Victoria, and one that is accessible for many different experience levels depending on the route taken. This sign from the start of the walk gives a nice overview with a basic map.

Via Wellington Plains
This is the most popular option and the easier of the two main walking routes to reach Lake Tali Karng. With this route, you begin from McFarlane Saddle on Moroka Road after driving up from Licola.
This means that you begin already at a lofty elevation, so most of the trail is relatively flat as you cross the Wellington Plains to Nyimba Camp. From there, it’s a steep descent down to Lake Tali Karng and back.
Read more on this below, as it’s the route that we decided to take.
Tip: This option is possible to do as a day hike as well, if you leave from McFarlane Saddle early enough and don’t want to carry an overnight pack. But you’d be looking at a long day hike of around 24km return.
Read next: 10 Tips For Your First Overnight Hike

Via Wellington River
For the more adventurous and determined, you can also reach Lake Tali Karng via the Wellington River. This requires a 17km one-way walk from Tamboritha Road, including 16 river crossings along the way. The river can be treacherous after heavy rain or early in spring, so check levels before leaving.
From the trailhead at the last bridge on the sealed road, the trail follows the Wellington River for 12km, before reaching an intersection. You can either take the Clive Lanigan Walking Track on the right to Lake Tali Karng or the Riggall Spur Track on the left. Most people opt for the Clive Lanigan Track on the way up to the lake through the Valley of Destruction, with the Riggall Spur Track via Echo Point the preferred return route (generally because it’s a bit longer).
You’re not allowed to camp at the lake anymore, so on this route, you can camp below the lake in the Valley of Destruction. You’ll see where other’s have camped previously along the river or up the valley.
Tip: If you’re able to take two cars, a good idea is to combine both the Wellington Plains and Wellington River trails together into a one-way overnight hike. This would require a car shuffle, between the trailheads. You can start at McFarlane Saddle, walk into Nyimba Camp for the night. The next day, walk down to the lake and out via the Wellington River.

Miller’s Hut
An alternative option for those not really keen on a long walk is to access the lake from Miller’s Hut. From there, you can follow a management track for 1.5km which will get you to Nyimba Camp. From the camp, you’ll walk down to the lake, the same way as those coming from McFarlane’s Saddle and Wellington Plains.
Tip: Access to Millers Hut is definitely 4WD only along Mount Wellington Track. High clearance is also highly recommended, as the track is steep and rough in sections. However, if you do have a 4×4, then you should definitely add on a visit to the hut anyway either before or after your hike, as the Mount Wellington Track is one of the most scenic drives in the High Country.

Starting Point for this Overnight Hike: McFarlane Saddle
We decided to begin our hike from McFarlane Saddle, which is a carpark and campground on Moroka Road and the trailhead for the Wellington Plains Walking Track. We left a car there overnight, and many others do too.
If you need to camp there, you can, although it’s not the nicest of spots. There is a drop toilet there. If you prefer somewhere else, then there are plenty of vehicle-accessible campsites along the Wellington River on Tamboritha Road past Licola.
More information and map for the Lake Tali Karng area available to download from Parks Victoria here.

Getting There and Away
Melbourne to McFarlane Saddle Campground and Trailhead: 300km or 4.5 hour drive via M1 and Tamboritha Road
To reach McFarlane Saddle, you’ll have to head to Heyfield and then Licola at the southern edge of the Alpine National Park. From Licola, take Tamboritha Road which leads up into the national park along the Wellington River.
At Arbuckle Junction, turn right onto Moroka Road and continue for 12km to McFarlane Saddle. The road is sealed until you reach the last bridge past Licola (at the trailhead for the Wellington River Walking Track to Lake Tali Karng), then it’s dirt roads after that. However, both Tamboritha Road and Moroka Road are generally kept in good condition and have been 2WD accessible the last couple of years during summer. Check before heading out though.
Note: In winter, there are road closures past Licola. This is a summer adventure for sure!

Overnight Hike to Lake Tali Karng
Here’s a more detailed look at our overnight hike to Lake Tali Karng. We hiked along the Wellington Plains one way and then exited via Millers Hut the next day, after a return hike down to the lake.
Watch my YouTube video of the hike below!
Day 1: McFarlane’s Saddle to Nyimba Camp
Distance: 8.5km | Time: 2 hours | Ascent: 147m | Descent: 179m
We left McFarlane Saddle quite late in the afternoon, but it was the middle of summer so we knew we had plenty of daylight left. We headed off across the Wellington Plains on the skinny walking trail that was easy to follow and obviously well-trafficked. It was a beautiful walk amongst the snow gums, across the expansive plains that spread out before us.
From Moroka Road, you’d never know that such beautiful plains were hiding behind the trees. It only took us a couple of hours to reach Nyimba Camp. A thick fog had started to set in and we were walking through a white mist for the last half an hour.
By the time we reached camp, there were already a few others set up so we found a spot amongst the snow gums well-spaced from others. The temperature dropped quite quickly with the fog, so it was bedtime just after dinner.
Read next: How to Plan Your Food for Hiking

Day 2: Nyimba Camp to Lake Tali Karng and Return
Distance: 8.6km | Time: 3.5 hours | Ascent: 633m | Descent: 639m
The next morning we were lucky enough to wake up to clear blue skies and a mild temperature. We left most of our gear in our tents and then simply carried a couple of daypacks between us to get down to the lake and back.
We followed the signpost from camp towards Lake Tali Karng. After just 500m, we reached an intersection, where the Gillios Track heads to the lake on the left and the Riggall Spur Track heads to the lake on the right. We had already decided to take the Gillios Track there and back. While it’s much steeper, it’s slightly shorter and is the more often used trail. The Riggall Spur Track on the other hand is slightly more gradual, about 1km longer, and comes out at the lake via Echo Point Track.

The trail headed through the forest that had visibly been burnt in a bushfire only a few years back. It was relatively gentle at first, until the last 1.5km which was a steep drop down the valley to the lake. There’s many little switchbacks cut into the track to make it slightly easier on your legs.
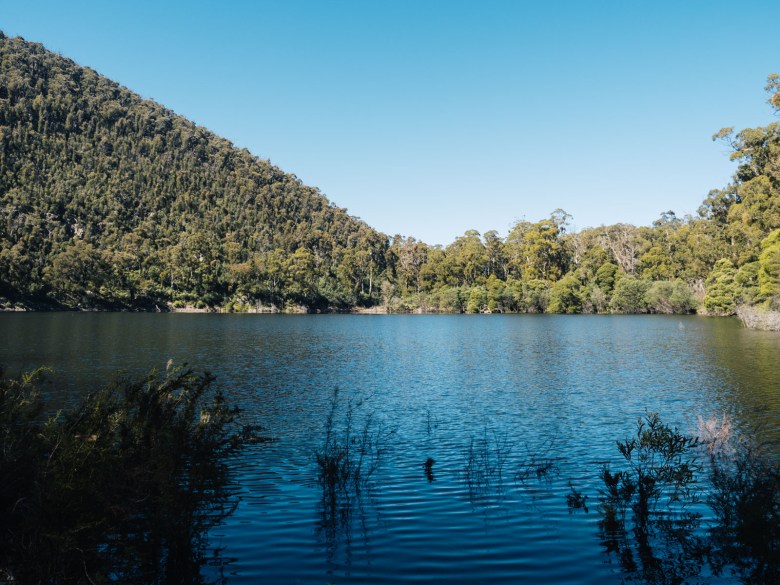
As you get closer down to the lake, you’ll start to see it through the trees. This is actually my favourite view of the lake, as you can really see how it sits in a bowl of rolling mountains. The trail was quite shady most of the way down, but it was still a tough descent on the knees.

The trail basically stops abruptly at the lake’s edge. There were lots of fallen trees, but we managed to get down to the water to get a nice view of the lake. The lake was overly full when we were there, so the start of the connecting trails were under water. But usually, there is a trail heading to your right, which links back up with Echo Point Track and Riggalls Spur Track, as well as, further around to the Clive Lanigan Walking Track which heads down the Wellington River.
This year, you would have had to navigate around the lake slightly off-track to reach the trails if you had plans to continue on down the river, or head back to Nyimba Camp via Riggall Spur.

We headed back up the same way we’d come, along Gillios Track back to Nyimba Camp. We were back in the early afternoon at camp, where we enjoyed lunch in the warmth of the sun, after being in the cooler forest.
Nyimba Camp to Millers Hut
Distance: 1.5km | Time: 30 mins | Ascent: 25m | Descent: 98m
We left Nyimba Camp after lunch and headed out to Millers Hut, where we’d left a car. This was an easy-to-follow vehicle management track, though it had some steep ups and downs, and a creek to cross.
We emerged from Millers Hut Track around a gate and found ourselves at the hut. There was only one 4WD camping there, otherwise not a whole lot to look at.

BUY THIS: Ottie Merino Hiking T-Shirt, Made and Owned in Australia
Our car was actually up the steep 4×4 track a bit further away from Millers Hut, but then we were able to enjoy the stunning views along Mount Wellington Track as we drove back out to Moroka Road. The drive up to Mount Wellington was worth doing, and added another highlight to the end of our overnight hike.

Essential Information for this Overnight Hike
If you’re looking to complete this hike yourself, then here’s some more practical information to help you plan and prepare.
Camping at Nyimba Camp
Nyimba Camp is a beautiful spot amongst the snow gums on the Wellington Plains. There are several spots to pitch your tent, with plenty of flat ground. You’ll see where people have previously built fire rings out of stones.
Despite some reports online, there is no toilet at Nyimba Camp. It was burnt down a few years back and as of 2023, it has not been rebuilt. Considering the amount of people who camp there, it’s unfortunate and I hope it’s rebuilt soon. This means that you must carry a trowel to dig a hole. Remember to leave no trace and carry all your toilet paper out with you.
Read next: How to Leave No Trace and Be Respectful in the Outdoors

Water Access
There’s no access to water if you’re hiking along the Wellington Plains. Even at Nyimba Camp, you won’t find any reliable water at camp. However, there is a creek running just 700m away from camp across the track leading to Millers Hut. I’d definitely treat or filter the water, as animals and human activity is common around the area.
I use a Sawyer Squeeze for water filtration in the alpine region.
Safety and Navigation
Navigation is relatively straightforward on the Wellington Plains and down to Lake Tali Karng from Nyimba Camp. While not necessarily marked, the trail is well-trafficked and easy to follow. Trail intersections also have signs, which is helpful. It’s still a good idea to have Maps.Me or a similar GPS app on your phone to help with distances and keeping on track.
If you come up via Wellington River, there is likely to be a little more difficulty following the trail, especially if the river and level of the lake is high. You should carry a map and GPS app or device with you to ensure you stay on track for this hike.

Essential Gear for This Hike
Sleeping bag | You’ll want a good sleeping bag for the High Country, one that will keep you warm no matter the temperature and be lightweight enough to pack easily in your backpack. Sea to Summit is one of the best brands on the market and you can’t go wrong with their Spark -9 degree bag.
Backpack | A 65L pack is usually a good option for multi-day hikes, especially in the Alpine region when you’re going to be carrying warm gear.
Hiking boots | I’m a bit old fashioned when it comes to my footwear and I can’t hike without my hi-cut boots. I’ve been wearing Keen Targhee boots for a couple of years and I’m super happy with them on all adventures.
PLB | Any hiker, especially a solo hiker, should carry a Personal Location Beacon. For the cost, these small devices can save your life anywhere, anytime. If you don’t want to buy one, you can hire one from any Macpac store, find out more here.
Power bank | I rely on my phone (maybe too much) while I’m hiking. From Maps.Me to recording videos to listening to music, I can recommend the BioLite power bank which will easily last days off the grid.
Tent | Try to keep your tent below 2kg as this can quickly become your heaviest piece of gear. I currently have the Big Agnes Copperspur 2-person tent, and it’s been my go-to for all my alpine hiking adventures.
Down jacket | You should be prepared for any weather on alpine adventures, so a down jacket is a must to ensure you keep warm. This Patagonia Nano Down is lightweight, warm and water repellent, so it’s perfect for the High Country.
Other Adventures Nearby in the Aussie Alps
If you’re looking for some more adventures in the surrounding Victorian Alps, then I have a few options for you:
- Hiking Mount Howitt and Exploring Bryce’s Gorge
- Camping at Lake Cobbler and Hiking Mount Cobbler
- Baw Baw to Mushroom Rocks Overnight Hike
Or find more: 16 Best Overnight Hikes in Victoria
Pin this post


[…] High Country trip headed to Lake Tali Karng and the Wellington Plains. I took my mum on her first overnight hike to Lake Tali Karng, and then dad took us in the 4×4 up to Mount Wellington and The Pinnacles Lookout and Fire […]
[…] to overnight hiking for my parents (who’d only done a short overnight hike previously at Lake Tali Karng last […]
Can confirm that there is a drop toilet and small water tank at Nyimba camp (December 2025).